Aligator Water Purification System
Aligator water purification system2
How aligator works.
After initial installation of the aligator system or when the water in the pool has been changed, chemical dosing of the pool should still take place, gradually reducing the amount of chlorine used until a level of 0.8 ppm of chlorine is reached. This should take place over a period of 4 to 6 weeks, in order for the aligator to “charge” the pool with Negative ions to kill any bacteria present in the water, during this start up period.
Monitor the colour of the electrodes once a week, If working correctly they should be a blue/green colour. Should any white scaling appear this may be removed with a kitchen cloth. Continue to check the balance of the water once a week and adjust accordingly.
!Vacuuming and Backwashing!
During the first six weeks, especially the first two, frequent vacuuming and backwashing must be done to clear away the residue of solids being solidified by the action of the aligator. This action makes the water crystal clear. After a period, depending on how contaminated the water was before the aligator was fitted, the vacuuming and backwashing may be resumed at the normal frequency. Visual inspection of the bottom of the pool showing no solids present indicates this situation. A frequent vacuuming and backwashing policy however, is absolutely essential for the good management of your pool.
!Water Preparation!
Test pool water and bring to ideal levels:
pH: 7.0 to 7.4
Alkalinity: 100 to 120 ppm for Marblelite pools
120 to 140 ppm for Fibre glass/Vinyl pools.
Chlorine: 1.2 to 1.4 ppm
Cyanuric: 40 ppm to 60 ppm
!Cyanuric!
is a stabilizing compound used to stabilize chlorine against dissipation by sunlight. If the level is above 80 ppm it must be reduced by dumping water and adding fresh until you have acquired the correct level. It is advisable not to use stabilized chlorine in indoor pools.

Aligator Water purification
System3
Installation
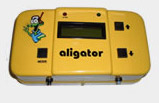
The aligator control unit requires a continuous power supply in the form of a normal wall socket. Power consumption is minimal and is immediately transformed down to a safe low voltage by the supplied plug in transformer.
The aligator control unit should be hung on the wall by its attached bracket, conveniently near to the pool pump and filter using a single screw.
The electrode chamber is installed in the pipe work between the pump and filter, adaptors are supplied with the unit that fit the most common sizes of pipes used in installations.
The clear top of the chamber features an arrow to indicate the water flow direction, ensure that the chamber is fitted the correct way round with the arrow towards the filter. This will ensure that the flow switch operates correctly.
After checking that the existing pipe work will fit the chamber adaptors and ensuring that the pump is turned off, a suitable section of pipe should be removed and the chamber glued into place, not forgetting to glue the adaptors in, if required.
Connect the flow control leads and the plug in electrode leads that are attached to the control unit to the connectors on the chamber. The two pairs of leads have different connectors and each pair can be either way round. The control unit automatically reverses the polarity every twelve hours to reduce wear on the sacrificial electrodes.
Allow time for the plastic glue to cure, (see instructions on the glue container) and restart the pump and filter system. Ensure that the electrode chamber is full of water.
Connect the 12volt plug to the aligator control unit and plug the transformer into the mains socket. Two green lights should illuminate showing correct operation.
!How it works..!.
Copper- Silver Ionisation System
SILVER has long been known as a bacterial killer and used extensively by the medical profession before the introduction of antibiotics, and COPPER is recognized as one of the best algaecide killers known to man.
It was NASA that designed an ionization system for their Apollo flights, using copper silver electrodes to purify their water. We have used the same technique to kill the bacteria and algae found in swimming pools.
Safe controllable low voltage DC current is transmitted from the aligator Control unit to special anodes fitted in the water chamber where electrolysis takes place, causing solutions of Copper, Silver and other minerals to form in the water. These are called ions (atoms), hence the name “Ionic Purifiers”. These ions are positively charged (+) and are created in billions each second. All bacteria, viruses, algae and fungi spores are negatively charged (-) therefore the ions are attracted to the cells of contaminants, the copper ion damages the cell wall, allowing the silver ion to then penetrate and destroy the cell.
•Copper and Silver ions are pH neutral, non-corrosive and have no effect on the human body in the concentration used to treat the water.
•Minerals with none of the side effects of chlorine purify the water naturally.
•The ions are not oxidising agents like chlorine, so they do not burn up body fats, hair, and other organic matter. They only purify water and control algae and fungal development. Hence a small amount of chlorine is still required to burn off this organic matter.
•When using the aligator unit, the control of the current is automatic and self regulating, compensating for the conductivity and flow rate of the water.
!The Electrodes...!
The aligator electrodes are a composition of a number of alloys, the content of which took many years to establish. Under good pool management i.e.; keeping the balance of the water within range, the electrodes will last up to 18 months. The correct wear pattern should be a progressive reduction in the diameter until the electrode is slightly more than the width of a pencil. At this point they should be replaced. NB Any other pattern of wear indicates that the water balance is not being managed correctly.
!Replacing aligator electrodes!
Turn of the power supply to the pump and unit to ensure no water flows. Turn off any flow control valves fitted into the existing pipe work.
Access to the chamber is by unscrewing the top flange and gradually easing out the top transparent lid with a screwdriver. A rubber “O” ring situated around the base of the lid creates the seal. Once the lid is removed the electrodes can be replaced by releasing the 10mm stainless steel bolts securing them through the lid. Make sure on replacing the electrodes, the rubber seal is placed against the lid underface followed by the plastic washer then the electrode. On replacing the lid, make sure the location lugs are in line and the water flow arrow is in the correct direction before pushing the lid into the chamber.
Open any flow controls that were turned off and switch on the power supply to the pump and run, ensuring that the electrodes are once again underwater, switch on the power supply to the control unit. The electrodes should be submerged at all times that the control unit is functioning.
Check that the two green LED lights are once again illuminated.


